Monday, October 10, 2011

Cinnabon Cinnamon Rolls


I've been stressed.

So stressed.

Work. Big, important, global event happening at the end of October where I play tour-guide to a bunch of Chinese journalists. 20,000 things to do to prepare for said big, fat event.

Stress.

So, I did the only thing natural one can do when stressed. I made the most delicious sugary, ooey, and comforting thing I could: Cinnabon cinnamon rolls. Remember those browned-butter cinnamon rolls I made a long time ago? Throw away that recipe. Those are 10 times harder to make and taste half as good as these babies.


And they really do taste EXACTLY like Cinnabon cinnamon rolls. I think the vanilla pudding is what does it. And the frosting is dead on too.

I ate approximately 10 and felt so great. Don't think of it as an unhealthy amount of sugar, think of it as anti-anxiety medication. It worked for me.

Enjoy.


Cinnabon Cinnamon Rolls
ROLLS:
  • 1/2 cup warm water
  • 2 packages dry yeast
  • 2 Tbl. sugar
  • 3 1/2 oz. pkg. vanilla pudding mix
  • 1/2 cup margarine −− melted
  • 2 eggs
  • 1 teas. salt
  • 6 cups flour

CREAM CHEESE FROSTING:
  • 8 oz cream cheese
  • 1/2 cup margarine
  • 1 teas. vanilla
  • 3 cups confectioner's sugar
  • 1 Tbl. milk

  1. To make frosting, mix all ingredients until smooth.
  2. In a bowl combine water, yeast and sugar. Stir until dissolved. Set aside.

Rolls:
  1. In large bowl, take pudding mix and prepare according to package directions.
  2. Add margarine, eggs and salt. Mix well. 
  3. Then add yeast mixture. Blend.
  4. Gradually add flour; knead until smooth. Place in a greased bowl. Cover and let rise until doubled.
  5. Punch down dough and let rise again.
  6. Then roll out on floured board to 34 x 21" size. Take 1 cup soft butter and spread over surface. 
  7. In bowl, mix 2 cups brown sugar and 4 teas. cinnamon. Sprinkle over top. 
  8. Roll up very tightly. With knife, put a notch every 2". Cut with thread or knife.
  9. Place on lightly greased cookie sheet 2" apart. Take hand and lightly press down on each roll.
  10. Cover and let rise until double (I put mine in the fridge overnight).

Bake at 350 15−20 minutes. Remove when they start to turn golden. DON'T OVER BAKE!!

Frost warm rolls with Cream Cheese Frosting

Saturday, October 1, 2011

rat-a-tat-a-touille


I made ratatouille awhile ago to balance out my frequent habit of making a bowl of cookie dough and eating the entire thing. When you have a pile of vegetables for dinner all desert binges seem justified.

The recipe, from A Smitten Kitchen, was suggested to me by my vegetarian sister-in-law. For that and may other reasons, I really like her

It was easy, cheap, delicious, and guess what?! A big. fat. healthy. pile of vegetables!


If and when I make it again, I would double the tomato puree to add a bit more liquid to the dish. I like my rice to have something sticking to it, you know?

Also, I used feta cheese instead of goat cheese because it's what I had on-hand and I'm crazy like that. I would do it again, it was delicious.

The recipes looks like it is complicated but I swear the prep time is 30 minutes max.

Enjoy!


Ratatouille
Adapted from Smitten Kitchen


1/2 onion, finely chopped
2 garlic cloves, very thinly sliced
2 cup tomato puree
2 tablespoons olive oil, divided
1 small eggplant (my store sells these “Italian Eggplant” that are less than half the size of regular ones; it worked perfectly)
1 smallish zucchini
1 smallish yellow squash
1 longish red bell pepper
Few sprigs fresh thyme (I omitted and didn't miss a thing)
Salt and pepper
Few tablespoons soft goat or feta cheese, for serving


Preheat oven to 375 degrees F.


Pour tomato puree into bottom of an oval baking dish, approximately 10 inches across the long way. Drop the sliced garlic cloves and chopped onion into the sauce, stir in one tablespoon of the olive oil and season the sauce generously with salt and pepper.


Trim the ends off the eggplant, zucchini and yellow squash. As carefully as you can, trim the ends off the red pepper and remove the core, leaving the edges intact, like a tube.
On a mandoline, adjustable-blade slicer or with a very sharp knife, cut the eggplant, zucchini, yellow squash and red pepper into very thin slices, approximately 1/16-inch thick.


Atop the tomato sauce, arrange slices of prepared vegetables concentrically from the outer edge to the inside of the baking dish, overlapping so just a smidgen of each flat surface is visible, alternating vegetables. You may have a handful leftover that do not fit.


Drizzle the remaining tablespoon olive oil over the vegetables and season them generously with salt and pepper. Remove the leaves from the thyme sprigs with your fingertips, running them down the stem. Sprinkle the fresh thyme over the dish.


Cover dish with a piece of parchment paper cut to fit inside. (Tricky, I know, but the hardest thing about this.)
Bake for approximately 45 to 55 minutes, until vegetables have released their liquid and are clearly cooked, but with some structure left so they are not totally limp. They should not be brown at the edges, and you should see that the tomato sauce is bubbling up around them.
Serve with a dab of soft goat cheese on top, alone, or with some crusty French bread, atop polenta, couscous, or your choice of grain.

Sunday, September 18, 2011

Blueberry Crisp


Ok, where the heck did summer go?

I have a very big beef with Utah right now, for multiple reasons. One reason is the hugely anticipated rivalry BYU vs. Utah game yesterday. Don't even get me started on how embarrassing that was. Then there was the fact that summer lasted approximately two months. Winter was a whopping six months long with the final snow falling on May 30th. May 30th! June was coldish but ok, July and August finally brought the heat, and now September is letting in the 60s like it aint no thing.

It should be 80 degrees in September, not 60. I just bought a really cute summery dress from Anthropologie. Guess that's going in the closet for another year.


Annnnnnd I had to go into work on Saturday to meet some very threatening deadlines. That one can't technically be blamed on the state of Utah, but I am adding it to the list anyway.

At least there is blueberry crumble to comfort me. That is precisely what I came home to yesterday after we left the BYU game. Life didn't seem so terrible once I was shoveling blueberry crisp and ice cream in my face. No, not so terrible at all.

The recipe is straight out of the Betty Crocker Cookbook and I wouldn't change a thing. It was delicious and the fruit didn't need any extra sugar at all. Since it is so low sugar and so healthy, I went ahead and ate five servings to get all my fruits for the day. You can too. 


Blueberry Crisp
  • 4 cups fresh or frozen blueberries
  • 3/4 cup packed brown sugar
  • 1/2 cup flour
  • 1/2 cup oats
  • 1/3 cup butter, softened
  • 3/4 teaspoon ground cinnamon
  • 3/4 teaspoon ground nutmeg
  • Serve with ice cream
  1. Heat oven to 375. Grease bottome and sides of an 8-inch pan.
  2. Spread blueberries in pan. In a medium bowl, combine all remaining ingredients (except the ice cream, of course) until well mixed; sprinkle over berries.
  3. Bake about 30 minutes or until topping is golden brown and the blueberries are warm and tender when pierced with a fork. Serve warm with ice cream.

Thursday, September 1, 2011

My Version of Waldorf Chicken Salad


I am not a salad person. I want to be. I wish I was... Salad people seem so hip sometimes, you know? Like runners. I am always wishing I was a runner or a salad person. But alas, the cool runner, salad, fruit smoothie lifestyle isn't meant for me. 

Lettuce just doesn't do anything for me. Every now and then I try to fool myself into thinking that I'm fit and healthy and a salad person and I bring salads to work for lunch. I try to make a big production of pulling my salad out of the fridge and really play up the assembly process so my coworkers think good things about me like, "Wow, Jocelyn is a salad person. Man I wish I was a salad person like Jocelyn." Then I eat it, feel superior, and become absolutely, desperately starving 3o minutes later. 

I can't handle that.

This salad may just be the exception, however. It's got a lot more going on this lettuce. There's a lot in there that can fill you up and that is what I need! I need to be full. I need it. Plus it's flavorful and yummy.

There's some nice tender chicken left over from this meal, crunchy Fuji apples, and crisp sweet grapes. If I had the money I would have candied almonds and put them in here too, but they are like $8 a jar and I am not that into almonds.

All in all I think this salad is a winner.

Enjoy!


My Version of Waldorf Chicken Salad
  • Roasted chicken, sliced (or you can grill a chicken breast and season it with thyme, rosemary, garlic, etc.)
  • Fuji or Pink Lady apples, cubed
  • Red, seedless grapes, sliced in half for optimal forking ease
  • Romaine Lettuce (or other type)
  • Dressing of your choice. I prefer blue cheese or ranch for this meal. It offsets the sweetness of the apples and grapes.
  1. Combine all ingredients in a bowl, toss, and serve chilled. Enjoy!


Wednesday, August 24, 2011

Slow Rosted Herb Chicken


I have been cooking a lot lately, but posting very little. I blame the full time job. Do you know that there are some people who blog for a living? Those people must have rich husbands who do more than go to college.

What a life.


I made roast chicken though. I made it because my husband was gone for two. whole. months. doing an internship in San Francisco. When a loved one is gone for an extended period of time and then return home, you make a roast chicken to celebrate. It's just what you do.

Andrew loved it. I got more rave reviews from this meal than all other meals combined. It was so nice.The chicken was fall-off-the-bone tender and had a rich, herby flavor without being overwhelming or overdone.

Making a roasted chicken is simple, easy, delicious, and makes  you feel like you're doing something really fancy like. It's a great feeling.

Enjoy!


Slow Roasted Herb Chicken
  •  1 whole chicken
  • 2 TBS chopped sage
  • 2 tsp dried rosemary
  • 1 TBS chopped basil
  • 1 bulb of garlic (4 cloves diced, 6 whole cloves)
  • 2 TBS olive oil 
  • 1 tsp salt
  • 1/2 tsp black pepper
  • 1 lemon cut length wise into 6 wedges
  • 1/2 onion, chunked
  • 2-3 sage leaves, whole
  • 2-3 basil leaves, whole
  • 1 cup white wine
  1. Remove the giblets and neck from the inside of the chicken. Rinse the chicken off under cold water, then use a paper towel to pat dry on the inside and out.
  2. In a bowl, combine: sage, rosemary, basil, diced garlic, olive oil, salt, pepper, and lemon juice from one wedge.
  3. Rub this herb mixture under the chicken's skin, leaving 2 TBS to rub on top of the chicken. Squirt some lemon juice on top of the chicken.
  4. Stuff the chicken's cavity with the garlic cloves, lemon wedges, onions, and extra sage and basil leaves.
  5. Let marinate over night.
  6. Put 1 cup of white wine in a glass cake pan or baking tray. Place the chicken in the baking dish and cook at 320ยบ for about 2 hours.

Friday, August 12, 2011

Rice Pilaf & Ramblings


I made these buttermilk biscuits the other day. Look delicious? They were disgusting. Literally horrible. This was better:

We'll get to that in a minute.

For the last two months, Andrew has been living and working in San Francisco while I have been living and working in Provo, Utah. He definitely got the cooler life. While he's been away I've been eating cereal for dinner, watching tons of Gilmore Girls reruns, and decorating.

See, we live in this apartment that kind of resembles a jail cell. There's a lot of lovely, stark white cinder block. Everywhere. When we moved in we figured we'd live here for a few months because it was great deal, but then we ended up getting lazy and decided that moving sucks and living somewhere that doesn't have mold issues is overrated.

So, since we decided to stay I decided to decorate on the cheap. Mind you that I am putting my husband through school so a lot of what we do is on the cheap. Now if you hate it and think it's awful, humor me because I am kind of in love with the new decor.


I bought black poster board ($.68) and three sheets of stationary ($1.25), printed out some images from the internet, traced them on to the black paper, snip, snip, snipped away, taped them on the stationary and stuck them in frames I bought at Ikea a while back.

It took me approximately 2ish hours and I was dead pleased by the results. I think I spent the next to hours admiring them.


Now featuring the cinder block. I can't hang pictures on the walls because we get fined for making holes and 3M strips don't work on it. So, I finally decided to do this.


It's not going to be featured on Martha Stewart Living anytime soon, but it makes me happy.


And I got ducks. The yellow one is named Cheryl. The red one is unnamed. Any suggestions?

Now about that rice pilaf... it is good and easy and a great addition to any meal.

Enjoy!


Mama's Rice Pilaf
  • 1 1/2 cups white rice
  • 3 cups low sodium chicken broth
  • nickle size bunch of angel hair spaghetti (uncooked)
  • 1/4 an onion, diced
  • 2 tsp butter
  • garlic powder
  • onion powder
  • salt
  • dash of cayenne pepper
  1. Break up the angel hair pasta into 1/2 inch sections. Place in a skillet with the butter and brown the noodles over medium-high heat (about 4 minutes). Stir occasionally or burning is eminent. 
  2. Place the browned spaghetti, rice, chicken broth, and raw onions into a rice cooker and let cook. Or if you don't have a rice cooker, place browned spaghetti, rice, chicken broth, and raw onions in a large pot with a lid and bring to a boil. As soon as it reaches a boil, turn heat to low and simmer for 20 minutes.
  3. If rice is too dry when done, add more chicken broth, a tablespoon at a time.
  4. When rice is cooked thoroughly, add in the seasonings in to taste.

Thursday, August 4, 2011

Blueberry buttermilk syrup


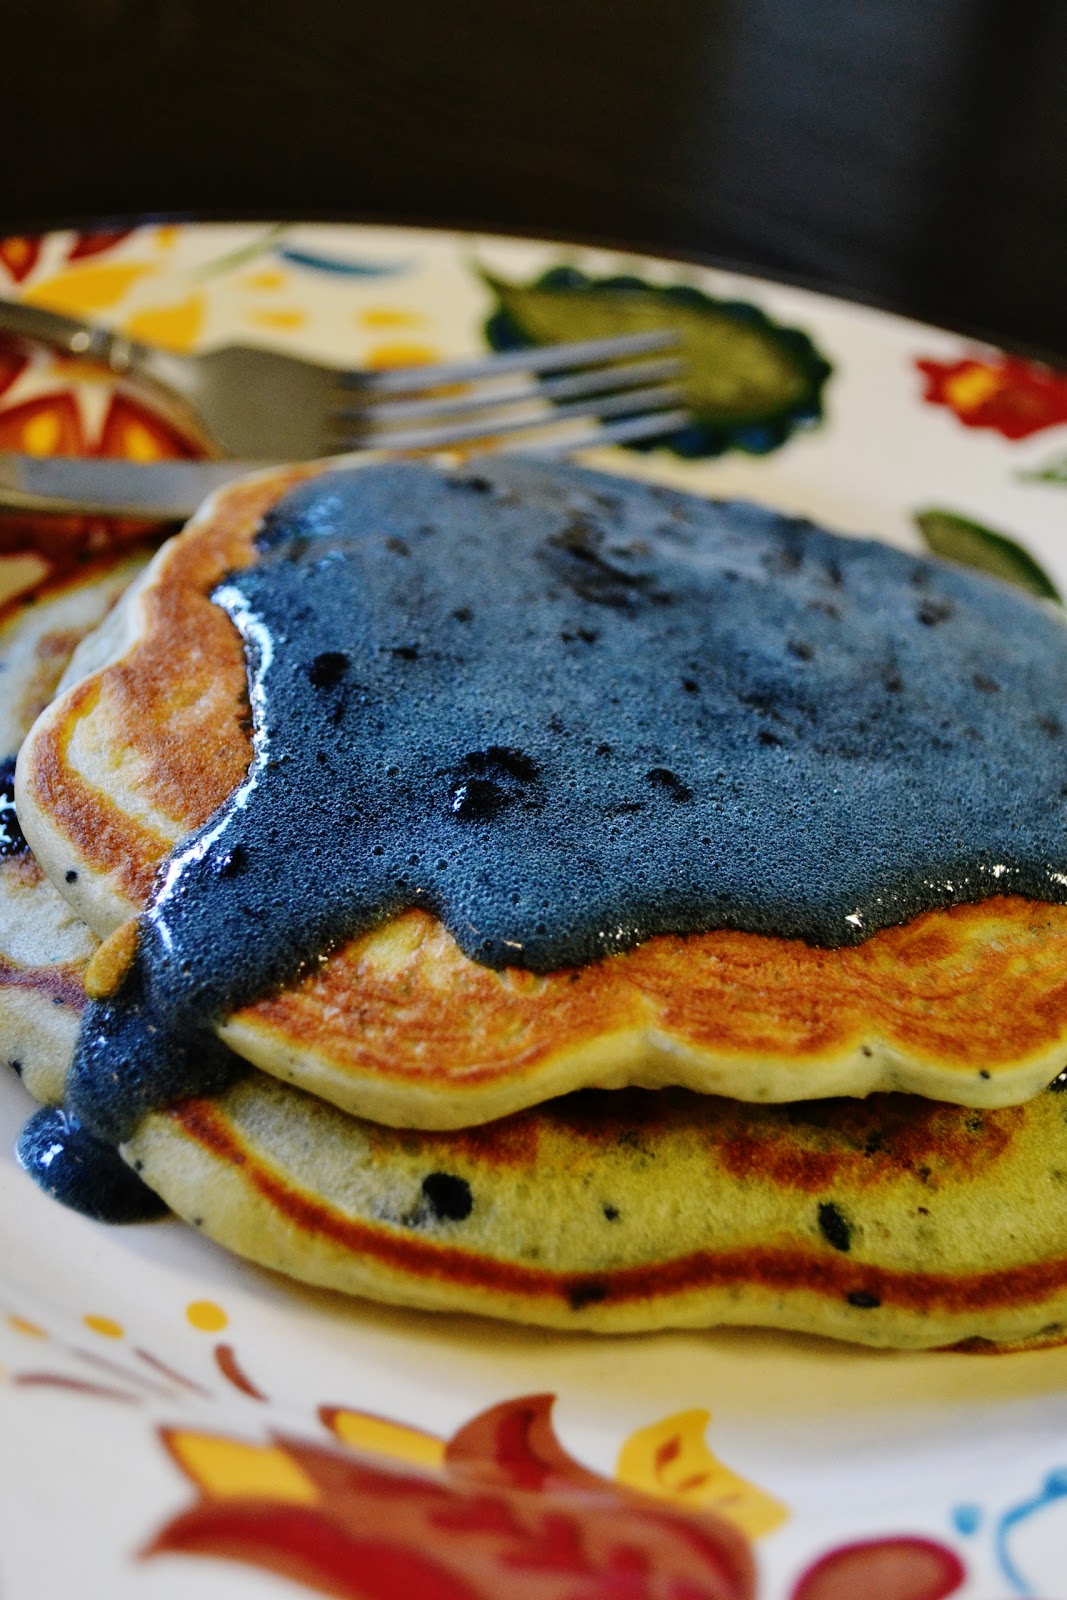
I bought a big thing of blueberries from Costco a few days ago because I've been craving some blueberry pancakes. It took me a few days to get around to making the pancakes but in the mean time I have been chowing down on the blueberries. They are so good!

Something I learned while eating a blueberry is that the insides are not blue. That came as quite a shock to me. I don't think I had ever eaten blueberries plain before so I was unaware of this phenomenon. I took a delicious, crisp bite into it and lo and behold... a little white blueberry belly!

Blueberries. You learn something new every day.

Anyway, tonight I made blueberry pancakes from this buttermilk pancake recipe (because I think there is nothing better than buttermilk pancakes in the world) and mixed a handful of blueberries into the batter. Easy-peasy.

Then I went ahead and made some blueberry buttermilk syrup that I dreamed up and oh. my. gosh.

I really enjoyed it.

I hope you try it and enjoy it to.


Blueberry Buttermilk Syrup*
  • 1 stick of butter
  • 1 cup sugar
  • 1/2 cup buttermilk
  • 1/4 cup fresh blueberries, pureed
  • 1/2 tsp vanilla
  • 1/2 tsp baking soda
  1. In a food processor or blender, throw in two handfuls of fresh or frozen blueberries and blend until pureed. 
  2. Melt the stick of butter in a sauce pan. Add the sugar, buttermilk, and blueberry puree.
  3. Bring to a boil and stir constantly.
  4. Remove from heat and add the vanilla and baking soda**.
  5. Stir to make frothy. You can strain it at this point to get out any pieces of blueberry skin, but I don't. That's where all the fiber and antioxidants live! Plus its yummy.
*Omit the blueberries and you have yourself some delicious Toolson Buttermilk Syrup which is practically divine all by itself. The blueberries though... they just push it right through those pearly gates.
**The baking soda and blueberries causes a chemical reaction that turns the foam green. Don't worry about it, after a few minutes you get a nice deep navy color.